显示标签为“BMW ICOM”的博文。显示所有博文

2023年10月18日星期三

How to Change the Language on BMW ICOM ISTA-D and ISTA-P

The BMW ICOM ISTA-D (Integrated Service Technical Application - Diagnostic) and ISTA-P (Integrated Service Technical Application - Programming) software are essential tools for diagnosing and programming BMW vehicles. While the default language is often set to German, it is possible to change the language to English or any other supported language. In this article, we will guide you through the simple steps to change the language on your BMW ICOM ISTA-D and ISTA-P software.

BMW ICOM are with multi-language,if you want to change the language,pls let us know when you make the order,or default be english. If you want to change the language after receive goods. how to operate as following:

How to change the ISTA-D language?
ISTA-D Language: Czech, Dutch, French, German, Greek, Italian, Japanese, Korean, Polish, Portuguese, Russian, Spanish, Sweden, Thai, Turkish

Open the language install folder on the desktop

Extract the language pack you desired, extract install.rar to C:/EC-APPS/ISTA/SQLiteDBs

Click the bmw language fix program on desktop


Open BMW Group ISTA program on the desktop

Select tool tab-client setting
Select the corresponding language

Which language do you want to you can choose,
EXIT ISTA-D and run again,

2: how to change the ICOM ISTA-P Language?
ISTA-P Language:  English, Chinese, Czech, Dutch, French, German, Greek, Indonesian, Italian, Japanese, Korean, Polish,Portuguese, Russian, Spanish, Swedish, Thai, Turkish

Open BMW GROUP ISTA-P on desktop
Click i icon and reset settings

Select Automatic search

Choose which language you want

After choose well you need save setting

Then you can run it again,
If you need want to learn more,you can contact with us: sale@cnautotool.com or you can search on our store: https://www.cnautotool.com

Conclusion: Changing the language on your BMW ICOM ISTA-D and ISTA-P software is a straightforward process that allows you to navigate and utilize these powerful diagnostic and programming tools in your preferred language, such as English. By following the simple steps outlined in this article, you can seamlessly switch the language settings and enhance your BMW servicing experience.

2017年12月9日星期六

Free download BMW ICOM ISTA-D 4.43.13 ISTA-P 3.71.0.200 (09.2023 )

Free download 09.2023 BMW ICOM diagnostic softwareISTA-D ISTA 4.43.13 ISTA-P 3.71.0.200 on Mega with questions and answers frequently asked.
Download:
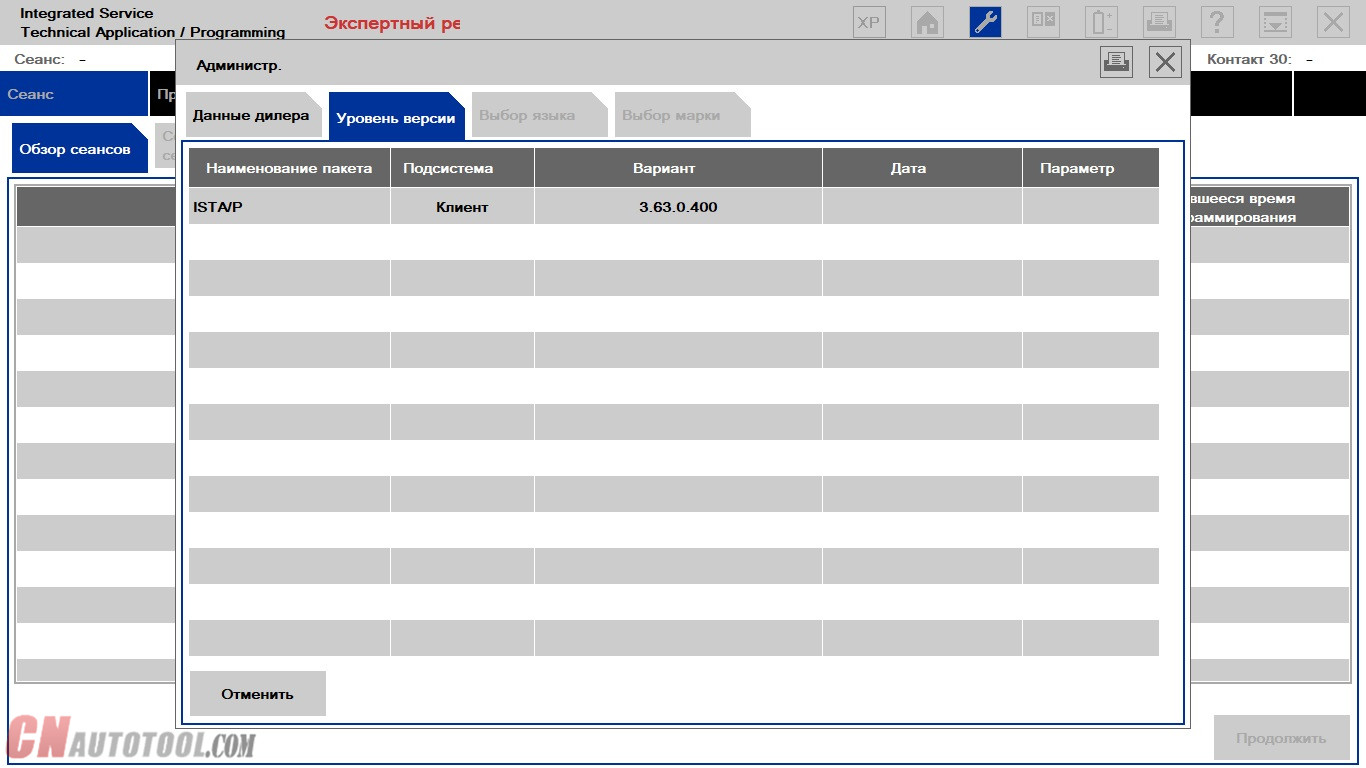
BMW_ISPI_ISTA-P_DAT_3.63.0.400.istap
BMW_ISPI_ISTA-P_SYS_3.63.0.400.exe
https://mega.nz/#F!5pIW1DyY!jYoL2TxwI1WyWfuudfN4nA
16-1
Note:  The software is not me, to use at your risk. I am not responsible for a bad use.
If you want use ICOM software with safety, i recommend this: http://www.cnautotool.com/goods-4828-ICOM+A2BC+for+BMW+with+Software+Plus+EVG7+Tablet+PC.html
I confirmed this works perfect in BMW diagnostic, coding and programming on Exx & Fxx cars.
16-2
Space required: A full installation of ista-p 3.63 without older installed versions needs 244gb space free.
Installation of 3.63.0 with installed version:
– 3.62.0 needs 103gb
– 3.62.1 needs 95gb
– 3.62.2 needs 114gb
– 3.62.3 needs 114gb
– 3.62.4 needs 114gb
– 3.62.5 needs 114gb
space free.
Vehicle coverage: From ISTA/P version 3.62.0 on (end of June 2017), the programming of the F, G, I series with ISTA/P will be gradually switched off.
Model series affected:
F, G, I series vehicles.
· Series F056 can no longer be dealt with as of ISTA/P 3.62.1.
· Series I001, F001, F025, S15A, S15C can no longer be dealt with as of ISTA/P 3.63.0.
FAQs:
Q: I have question about installing ISTA/P, clean and fresh install or installing over old version?
A: You have to uninstall the old version before.
Q: I have 110GB free, with istap file inside it will be free only 31GB and for installation is needed 230GB free, what now?
A: Purchase bigger HDD or download standalone.
Q: How did you install 3.63 with only 150gb? The installer would not continue…
A: First thought was to remove all data from ISTA/P but I have removed PsDZ and SQLiteDBs from Rheingold, I have tried and installer didn’t brake installation, instead of 240 GB it was only 137 GB needed.
Q: ISTA-P standalone? Sure? Where can i find this?
A: Here you go. 63.0 PSdZData – Lite and Full Versions:
Q: The folder pzd-data alone is not ista-p. how should it work? how to install the other files from ista-p?
A: You can better use Ista+ incl SDP because some Fxx are not supported in new Ista-p. Update Ista-p for Exx is not useful.
Q: I extracted all files then install bmw ispi ista p sys.. but nothing happen
A: You Need Loader.  Download ISTA-P Loader V6.3 Lite + activation key:
https://mega.nz/#!1tEQxIRJ!nJbc74da1LtbJQK1VAO4d02HMmtYu76Js5ZKLCp5PLI
UNBLOCK archive and extract with 7-zip
Password: beemerboy88
Or
use the easy way, install standalone version of ISTA+ and ISTA/P from here
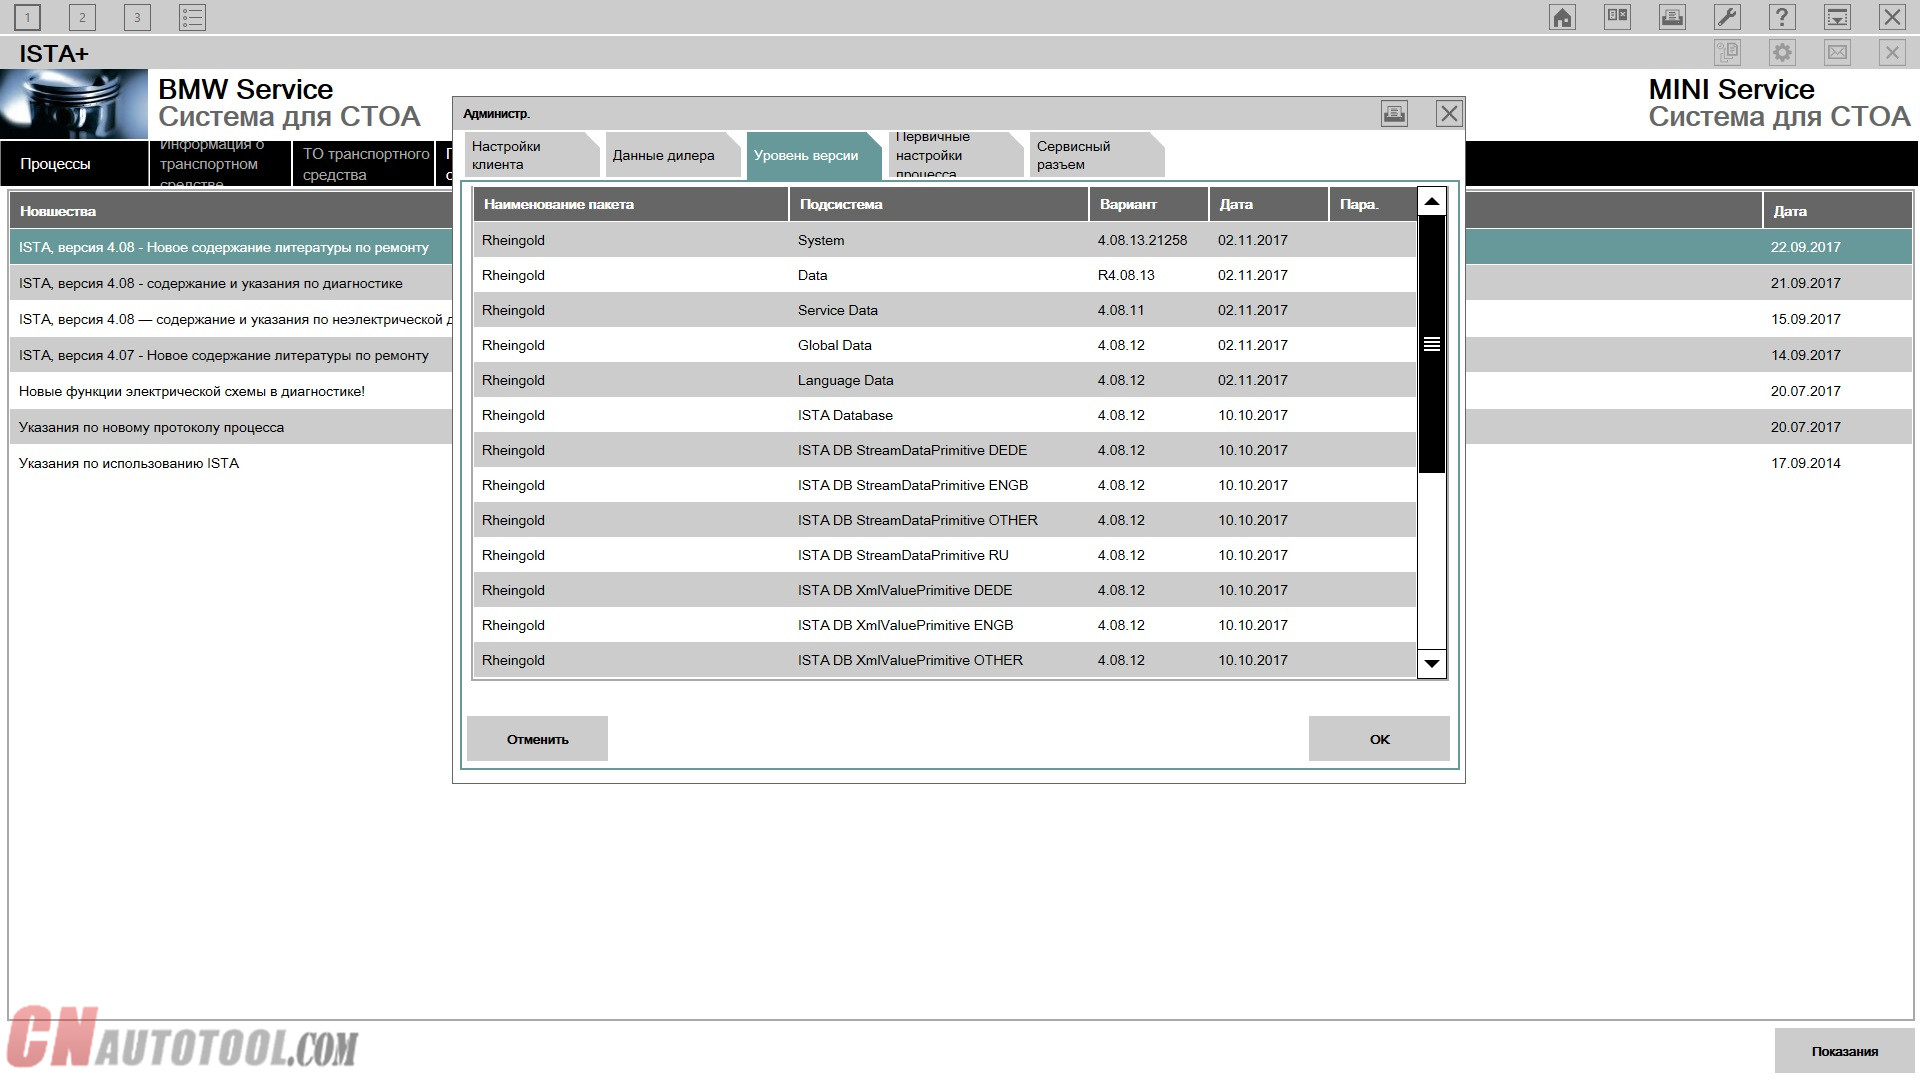
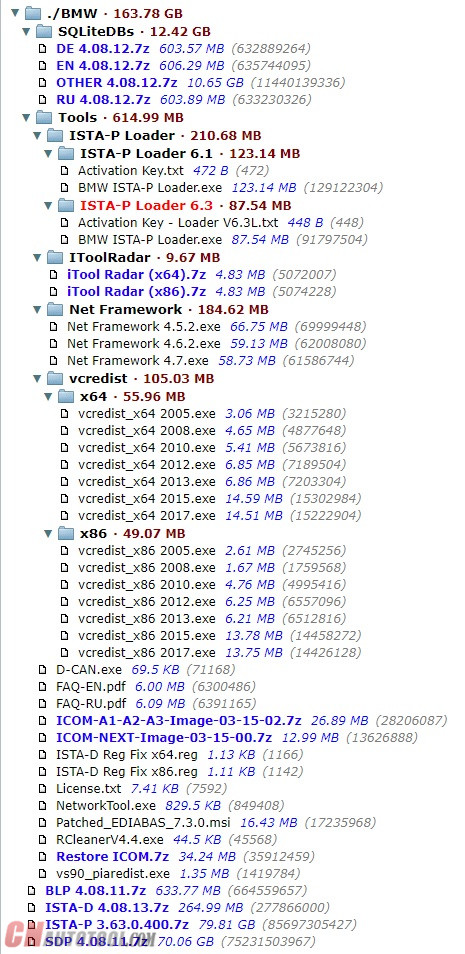
Standalone versions of ISTA-D 3.63.0.400 and ISTA-P 4.08.12:
16-3
For ISTA-P Loader thanks to beemerboy88.
SQLiteDBs 4.08.12, including RU, EN, DE, OTHER.
For unpack archives use 7-zip 16.04 or higher.
All installed and ready to work.
ISTA-P work with old and new Loader from beemerboy88.
Instructions for installation, configuration and solution of possible errors, is located in the Tools folder (FAQ-RU.pdf and FAQ-EN.pdf).
To view pdf files, use Adobe Acrobat Reader DC.
Don’t ask password from pdf files!!!!
Read carefully FAQ in Tools folder!!!
ISTA-P – 147 GB
Service Data (SDP) – 104 GB
Logistic Data (BLP) – 2.63 Gb
FASTA & HW check disabled !!!
What’s included in torrent:
16-4
“standalone” ISTA-Ps were on torrents for some old versions. They are basically copies of folders taken from the installed version. Then you just paste them to your computer at standard locations and use beemerboy88’s launcher.
You can still make your own “standalone” ISTA-P by installing it to a computer which has more disk space and then copy to the computer with insufficient disk space. Just be sure to uninstall old version first, else it will be a mess and you will never be able to uninstall them.
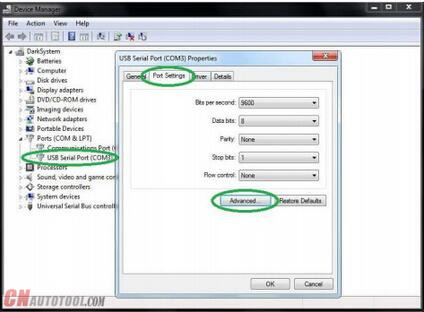
You also need to take into account that ISTA-P ON https:/www.cnautotool.com creates multiple temporary folders/files for each session and they may take some considerable amount of disk space. I would not risk using ISTA-P on a computer which has less than 10-20Gb of space left after pasting such “standalone” version.
BMW ICOM A2+B+C WIFI Setting Guide

Here is a tutorial on how to set WIFI for BMW ICOM A2+B+C diagnostic & programming tool, hope it helps.
STEP1:make sure you ICOM A2 have a WIFI card
go to 169.254.92.38/60080
user:root
pass: NZY11502
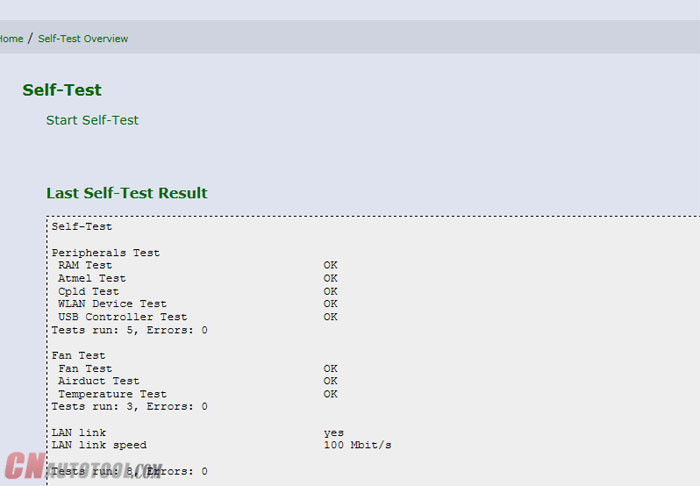
make a self-test, than you can got the test result , the WIFI function must be OK
15-1
STEP2:Go to 169.254.92.38/58000 make the WIFI setting, ( the bmwicomshop.com bmw ICOM a2 WIFI version no need setting)
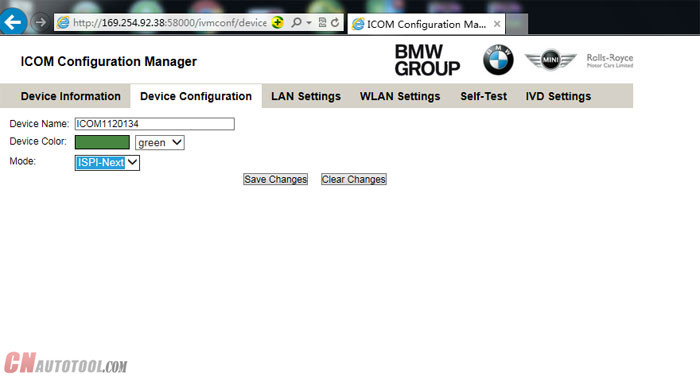
a . Set the mode to ISPI-NEXT
15-2
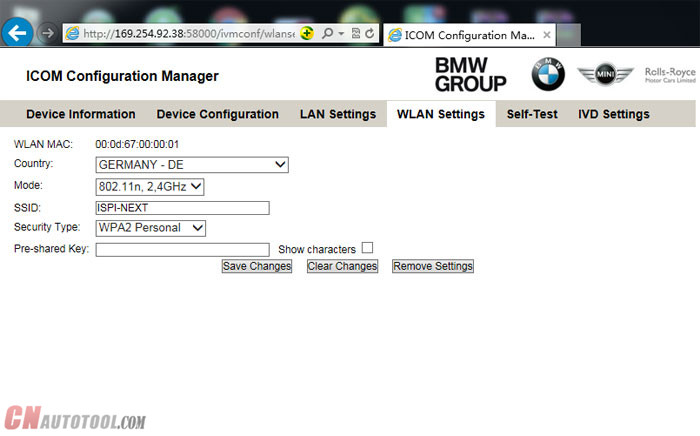
b . SET WLAN , SSID name ISPI-NEXT PASS:12345678 save
15-3
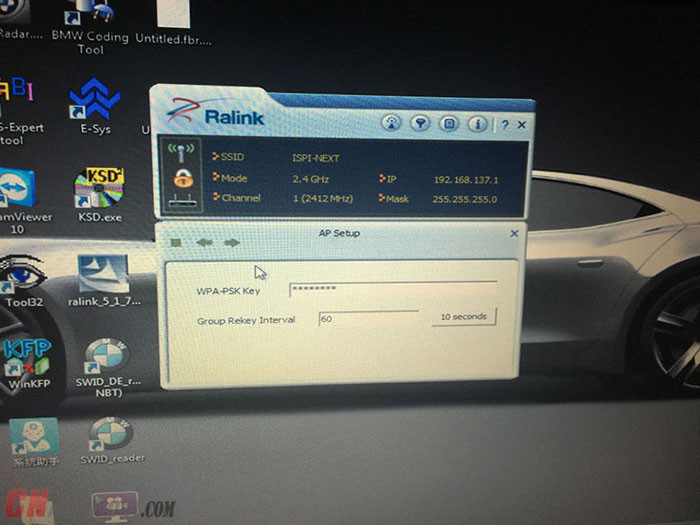
After the setting on ICOM is done , let’s make computer setting, suggest buy the a USB WIFI card , then set it to AP mode
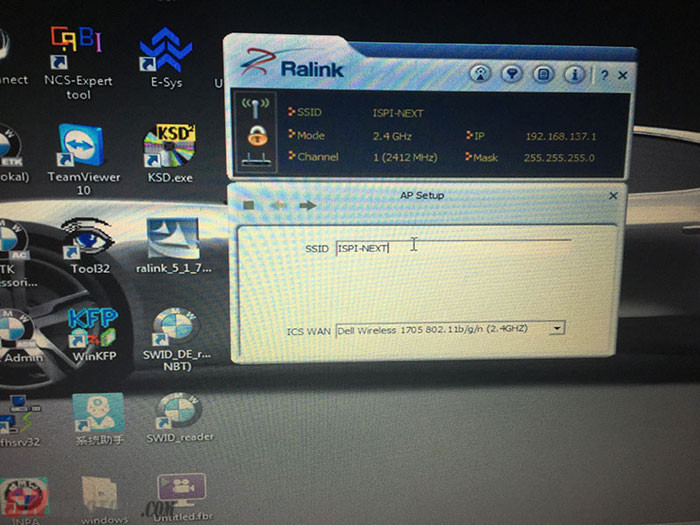
Then set same SSID name as ICOM Next; ISPI-NEXT
And choose WSP2 method , enter same password :12345678
15-4
15-5
Then OK, unplug ICOM LAN cable, restart ICOM waiting it connect to laptop WIFI!
15-6
Then start ISTA/D make diagnostic. Enjoy!

BMW ICOM A2 emulator system red indicator flash

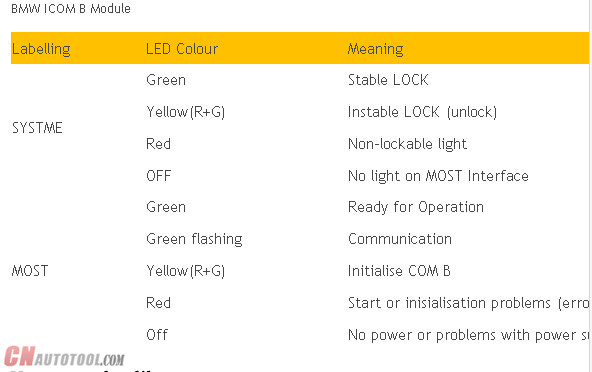
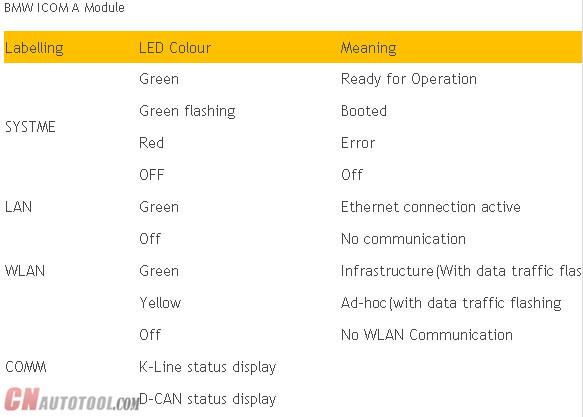
Before go deep into the topic today, let’s check the BMW ICOM ICOM A and ICOM B module indicator and meanings.
14-1 14-2
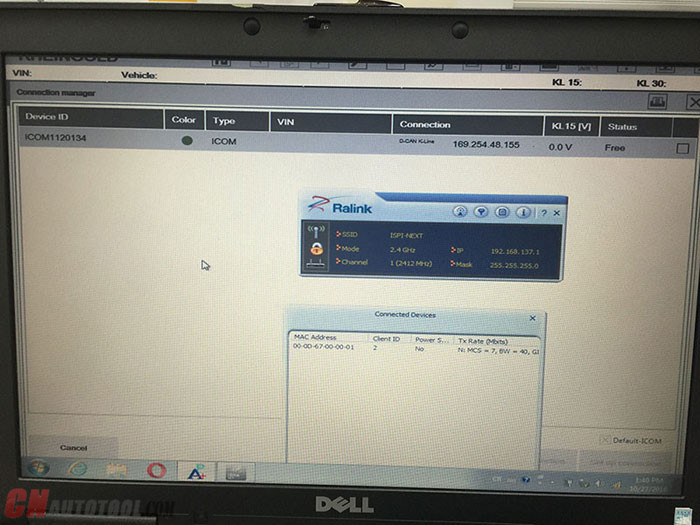
It is not different to see that if the Red LED indicator of either ICOM A or ICOM B emulator flashes, the Rheingold ISTA-D ISTA-P software will report error and fail to communicate with vehicle.
Problem& Symptom:
BMW ICOM A2+B+C diagnostic system A2 module red indicator blinking when connected to vehicle with LAN cable.
Solution:
2 solutions provided by experienced BMW ICOM diagnostic system experts:
DISCLAIMER: We are not responsible for the damage.
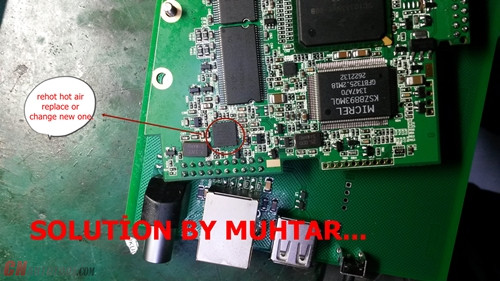
1)
1-rehot hot air gun this IC
2- Replace or change new one if necessary
3-The problem is the IC
14-3
2)
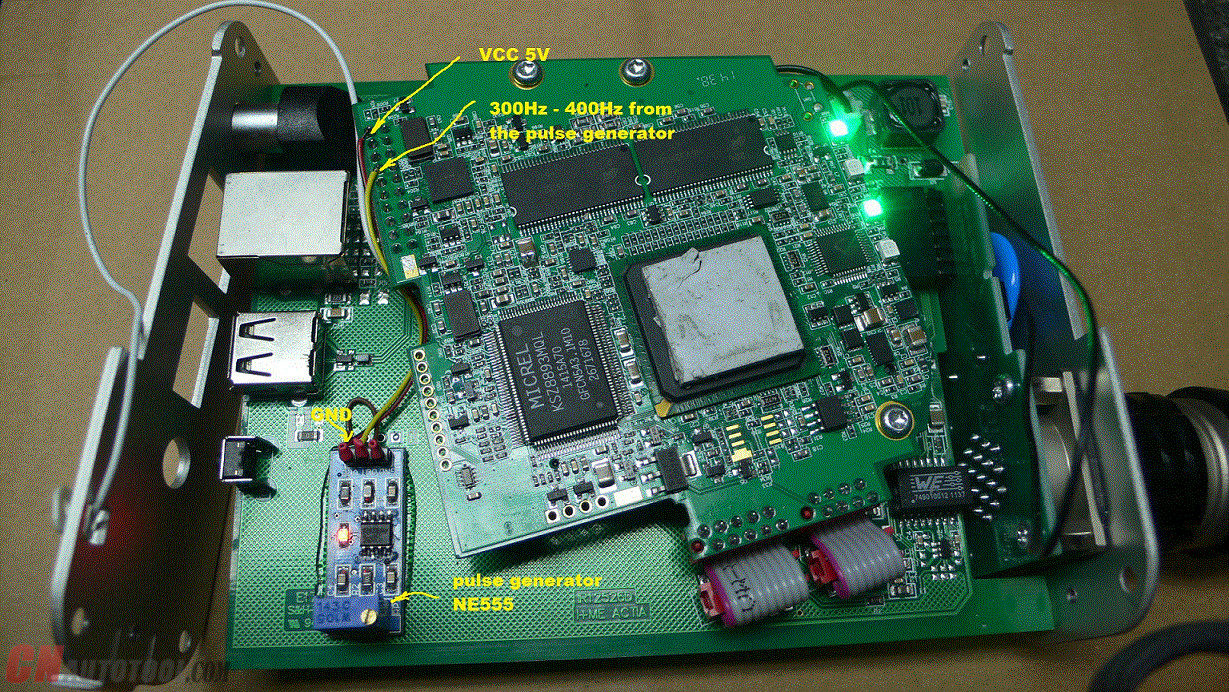
Fix the ICOM A2 from CnAutotool.com emulator firmware follow the PCB board displayed below:
The pulse generator to buy on auctions
14-4
white wire=the line to the WiFi antenna.
Others all marked in the PCB board

HOW TO DO PROGRAMMING WITH ISTA+

Until now, different systems for BMW diagnostic tool vehicle diagnosis (ISTA) and programming (ISTA/P) have been used. This means it was necessary to change systems several times when repairing a vehicle using software.
ISTA+ has been expanded so that all the required programming functions for the series F, G and I are integrated.
E-series vehicles still have to be programmed using ISTA/P!
The functions relevant for programming can be accessed via the following menus:
13-1
Vehicle treatment
● Software update
● Comfort – as per the suggested measures plan
● Advanced – with broadened scope
● Additional software (range of functions is not active yet)
● Control unit replacement
● Before exchange (preparation) – control unit read-out for the exchange
● After exchange (subsequent evaluation) – control unit configuration after exchange
● Vehicle modification
● Retrofit
● Conversion o Conversion (only coding)
● Back fitting
● Immediate measures
13-2

HOW TO DO DIAGNOSTICS USING ISTA+

How to start the ISTA workshop system:
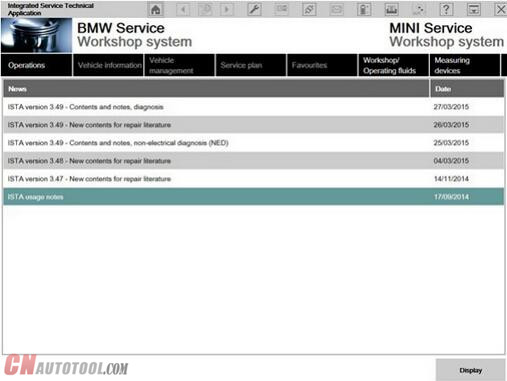
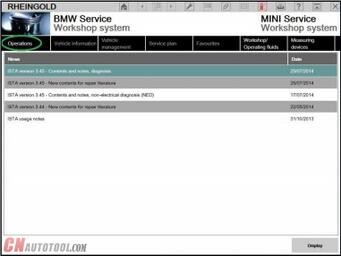
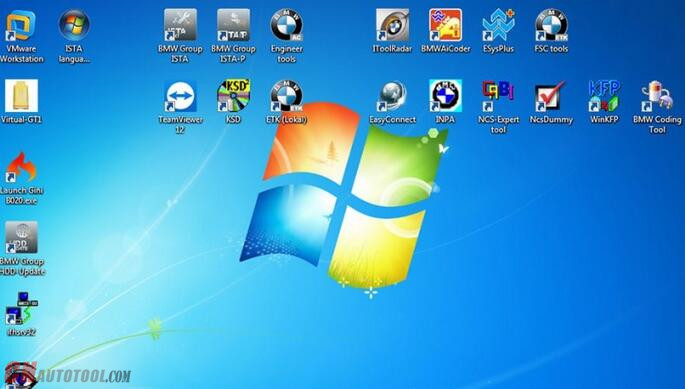
Double click the BMW diagnostic software ISTA+  icon in the Windows desktop created during the installation process above. After ISTA is started, the start screen appears. A list of news is displayed. You can set the display period in the Administration.
12-1
Once you have read the “Note on using ISTA”, close the dialog using the button “Next”. You can open a process from the start screen: Select the “Operations” menu.
SELECTING A VEHICLE WITHOUT CABLE CONNECTED TO CAR
Method 1:
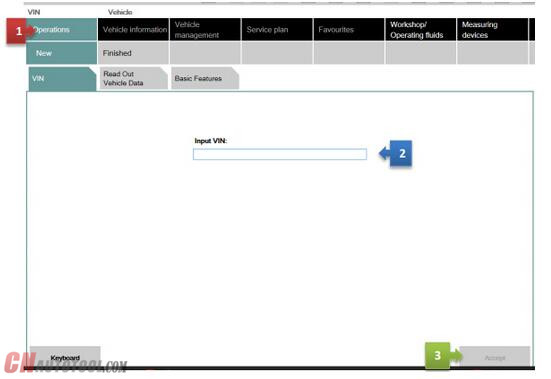
You can enter your short VIN (Last 7 of the VIN) and be able to pull relevant procedures or troubleshooting instructions without actually connecting to the car. To access this feature, launch ISTA+ and click on Operations tab (1). Then enter the short VIN into the VIN box (2). Then click on Accept (3). The Accept button will become active only when a VIN number is entered. You can explore features specific to your car from here.
12-2
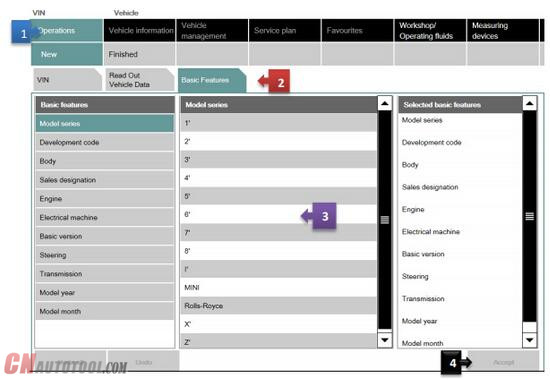
Method 2:
Follow the steps as in the picture below:
12-3
SELECTING A VEHICLE VIA “READ OUT VEHICLE DATA” WITH CABLE CONNECTED TO CAR
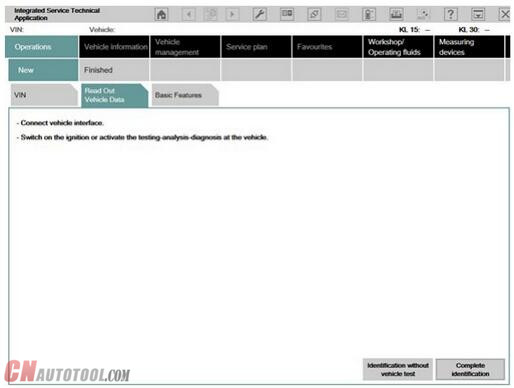
After you select the “Operations” menu from the start screen, the workshop system changes to the “Vehicle identification number” tab under the “New” menu item.
We will assume that you have connected the right interface to the car at this time (Refer to interfaces section). Our example will use BMW ICOM A2+B+C.
This is how to identify a vehicle by reading out the vehicle data, while automatically creating a process:
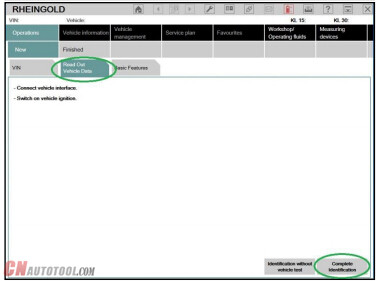
1 Click the “Operations” main menu item in the navigation area.
2 Select the “Read out vehicle data” tab and follow the instructions provided.
3 Click the “Identification without vehicle test” or “Complete identification”button
12-4
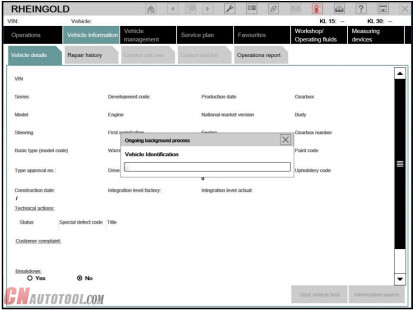
The connection to the vehicle is now established. The workshop system performs an identification of the vehicle. It also reads the vehicle identification number and further data from the vehicle. The progress of the identification operation is displayed on a progress bar.
12-5
Start vehicle test
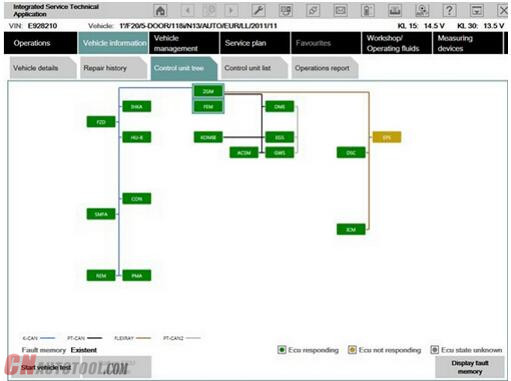
If vehicle identification was called up via “Read out vehicle data” and “Complete identification”, the vehicle test starts automatically following vehicle identification, followed by the vehicle operation and service data transfer and analysis. The control unit tree is displayed during the vehicle test
12-6
Here you can observe the ongoing determination of the control units that are fitted. If no control unit tree is available, the “Control unit list” mask is displayed automatically.
The control unit tree contains all the control units identified in the vehicle and displays their allocation to the relevant bus system. The control units are identified in succession and their fault memories are read out. The color then changes to display of the detected state. An explanation of the colors can be found in the lower section of the displayed mask. From this screen, if required you can restart the vehicle test or also call up control unit functions so that you can read out measurements or activate actuating elements.
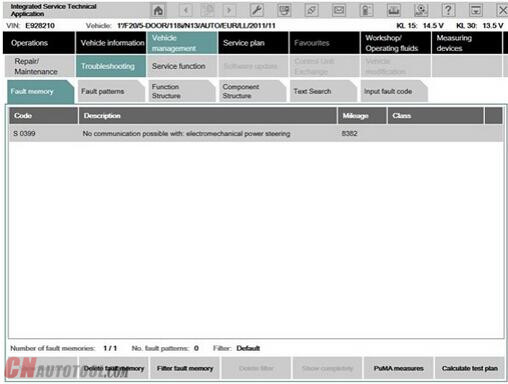
Before you can access a test plan you must first display the fault memory. This is how to view the fault memory:
1 Wait until the vehicle test is completed.
2 Click the “Display fault memory” button.
Show fault memory
After the vehicle test, click the “Display fault memory” button in the “Fault memory” mask. The fault codes that are read out and the associated description are listed here.
12-7
The function “Delete fault memory” can be carried out at the end of the guided troubleshooting. In order to start the guided troubleshooting, first calculate a test plan.
This is how to calculate a test plan:
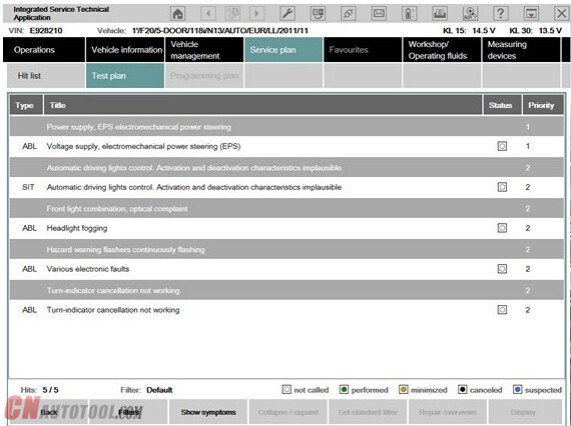
Click the “Calculate test plan” button.
Processing the test plan
The test plan lists the components and functions that might have caused the fault. The documents and test modules corresponding to the components and functions are displayed in the “Type” column, identified with “ABL”. In the “Type” column, documents and test modules are identified with an abbreviation.
Procedures localize a fault and give advice on rectifying it. This is how you start a procedure:
1 Select the required procedure from the test plan.
2 Click the “Display” button.
12-8
The priority in the test plan does not necessarily specify the call-up of the processes. The priority is to be regarded as a recommendation for processing.
A test module is primarily designed to identify the cause of a fault. Furthermore, service functions can be performed via procedures. Information can be displayed within a test module, as well as measured values read out or entered. Furthermore, queries can be made available in procedures via selection screens.
After a test module has been carried out, additional information is added to the test plan if this is necessary for further troubleshooting or fault elimination.
12-9
After the test plan has been completed, you should carry out the “Delete fault memory” function.
This article is posted by www.cnautotool.com. if you have questiones, please contact us sale@cnautotool.com

HOW TO USE BMW RHEINGOLD ISTA WITH BMW ENT CABLE

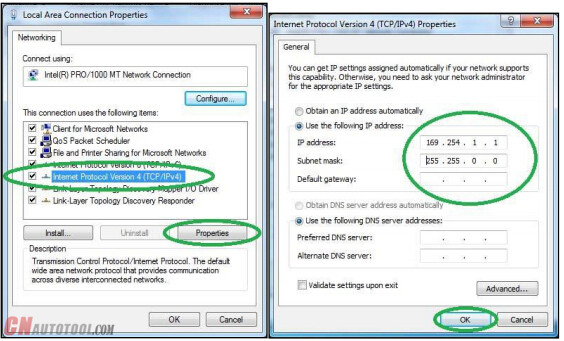
1. Open used for connection network adapter properties, then “Internet Protocol Version 4 (TCP/IPv4)” properties, then enter 169.254.1.1 for “IP address” and 255.255.0.0 for “Subnetmask”.
11-1
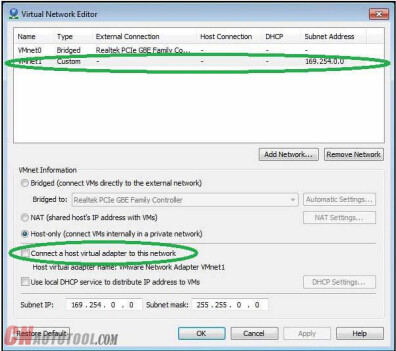
2. If VMware is installed, open Virtual Network Editor and disconnect from the host any adapters with Subnet Address 169.254.0.0.
11-2
3. Connect car with ENET cable to PC, turn ignition on.
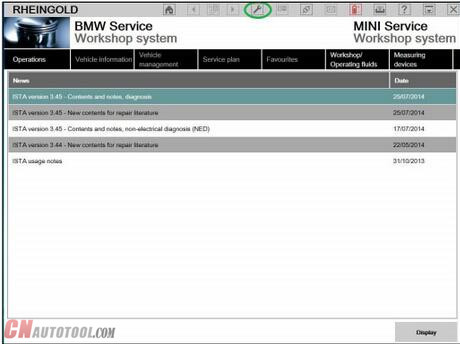
4. Now run BMW diagnostic tool BMW Rheingold ISTA using shortcut in start menu and wait until it boots, then press settings button.
11-3
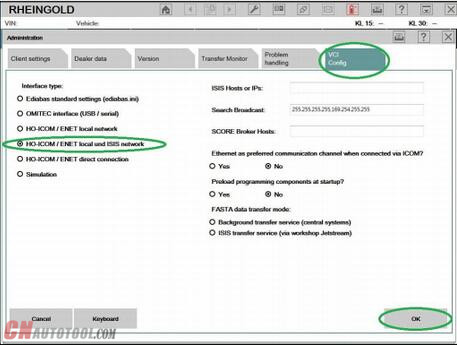
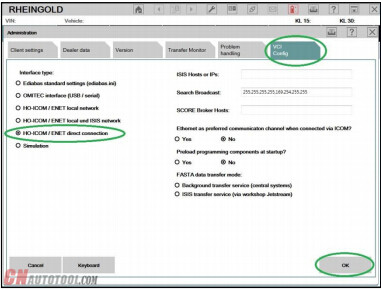
5. Select “VCI Config” tab and “HO-ICOM/ENET local and ISIS network”, then “OK”.
11-4
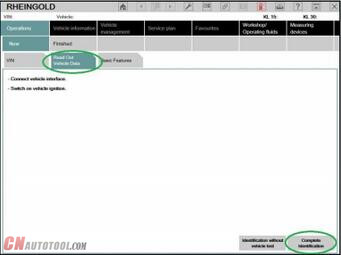
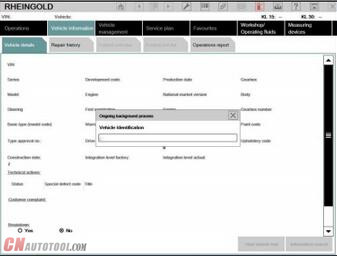
6. Go “Operations”, then “Read Out Vehicle Data” and “Complete Identification”.
11-5
11-6
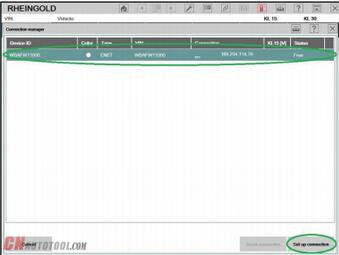
7. Select your ENET connection from the list and press “Set up connection”button.
11-7
11-8
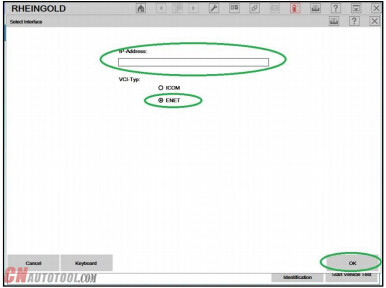
8. Alternatively you could select “HO-ICOM/ENET direct connection” in “VCI Config” tab and “ENET” mode with empty “IP-Address” field during connection setup.
11-9
11-10

HOW TO USE BMW RHEINGOLD ISTA WITH BMW ICOM

HOW TO USE BMW RHEINGOLD ISTA WITH BMW ICOM
1. Open used for connection network adapter properties, then “Internet Protocol Version 4 (TCP/IPv4)” properties, then enter 169.254.1.1 for “IP address” and 255.255.0.0 for “Subnetmask”.
2. If VMware is installed, open Virtual Network Editor and disconnect from the host any adapters with Subnet Address 169.254.0.0.
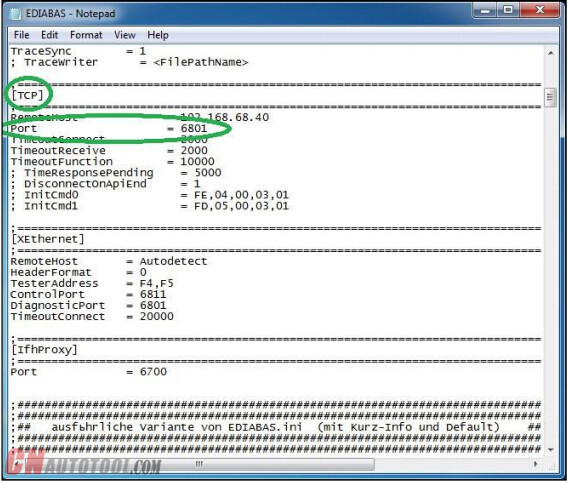
3. Open C:\EDIABAS\BIN\EDIABAS.INI with Notepad and check for “Port = 6801” in TCP settings.
10-1
10-2 10-3 10-4
4. Connect car with ICOM to PC.
10-5
5. Now run BMW Rheingold ISTA using shortcut in start menu and wait until it boots, then press settings button.
6. Select “VCI Config” tab and “HO-ICOM/ENET local and ISIS network”, then “OK”.
10-6
7. Go “Operations”, then “Read Out Vehicle Data” and “Complete Identification”.
10-7
8. Select your BMW Diagnsotic Tool from the list and press “Set up connection”button.
10-8
10-9
10-10

How to Use BMW Rheingold ISTA to Do Programming and Coding

BMW Rheingold ISTA is a software program used by BMW technicians for programming and coding various modules in BMW vehicles. It is an essent...